a8248d-2
Enhance your car with the ultimate DIY windshield repair kit
Enhance your car with the ultimate DIY windshield repair kit
Couldn't load pickup availability
DIY Car Windshield Repair Kit Tools Auto Glass Windscreen Repair Set Give Door Handle Protective Decorative Stickers
Features:
Allows anyone to fix a damaged windshield or window.
Single ingredient - eliminates mixing.
Creates an invisible, undetectable repair in damaged automobile windshields or other laminated glass for windows.(Icludes instructions.)
DIY windshield repair kit is designed to fill the air cavity with a strong penetrating adhesive that will bond the loose glass and restore the visibility.
The patented design evacuates the air to fill the cavities with specially formulated liquid glass,that distortion and bonds the loose glass preventing the damage from spreading.
Size: 10.3cm(Length) ,5cm( Diameter )
Weight: 28g
Material :Plastic & Rubber
opp plastic bag
warm tips
A bottle of repair solution is only two milliliters. It is only suitable for repairing 2 to 3 coin-sized cracks. It cannot be used for large cracks.
A.Before curing: Operating in ultraviolet environment is forbidden.
lndoor or night operation is recommended.
B.Curing: Drop a drop of repair solution on the curing film, cover the damaged area,scrape the air bubbles with a blade,move to the sun for 10-30 minutes or use ultraviolet lamp instead until curing.
Note 1:
Avoid using in direct sunlight-work in shaded area.
Do not work on a hot windshield, park vehicle in shaded area and open for windows to cool glass surface.
A safety razor is required to remove components and finsh repair.
Do not let resin come in contact with painted surfaces.
Tips:
This product is packed in opp bags.
If it causes damage during transportation, please contact us in time and we will give you a satisfactory solution.
Package contents:
1 x Windshield Repair Injector
1 x repair resin
2 x Adhesive Seal
1 x Pedestal
5 x repair Film
1 x Razor Blade
1 x Instruction Manual

DIY windshield repair kit is designed to fill the air cavity with a strong penetrating adhesive that will bond the loose glass and-restore the visibility . The patented design evacuates the air to fill the cavities with specially formulated liquid glass , that clears the distortion and bonds the loose glass preventing the damage from spreading
NOTE:
A,Avoid using in direct sunlight - work in a shaded area .
B, Do not work on a hot windshield , park vehicle in shaded area and open windows to cool lass surface
C, A safety razor is required to remove components and finish repair
CAUTION :Do not let resin Come in contact with painted surfaces .
1 . Clean Damaged Area
CLEAN out any loose glass particles from PLT ( hole caused by striking object ) of the break using Pin from injector
Clean area surrounding break using a dry doth or paper towel
2 . Mount Seal to Windshield
PEEL backing oh " ONE side of adhesive Seal Line up hole in seal with Plt ( pointing Tab upward ) . Press seal to glass
Run fingers around seal to insure a good bond
3 . Remove Backing from Seal Mount Pedestal to Adhesive SealPeel backing from TOD side of adhesive seal Line up pedestal with adhesive seal making sure Tabs match up .
Press pedestal to glassRun fingers around pedestal to insure a tight bond
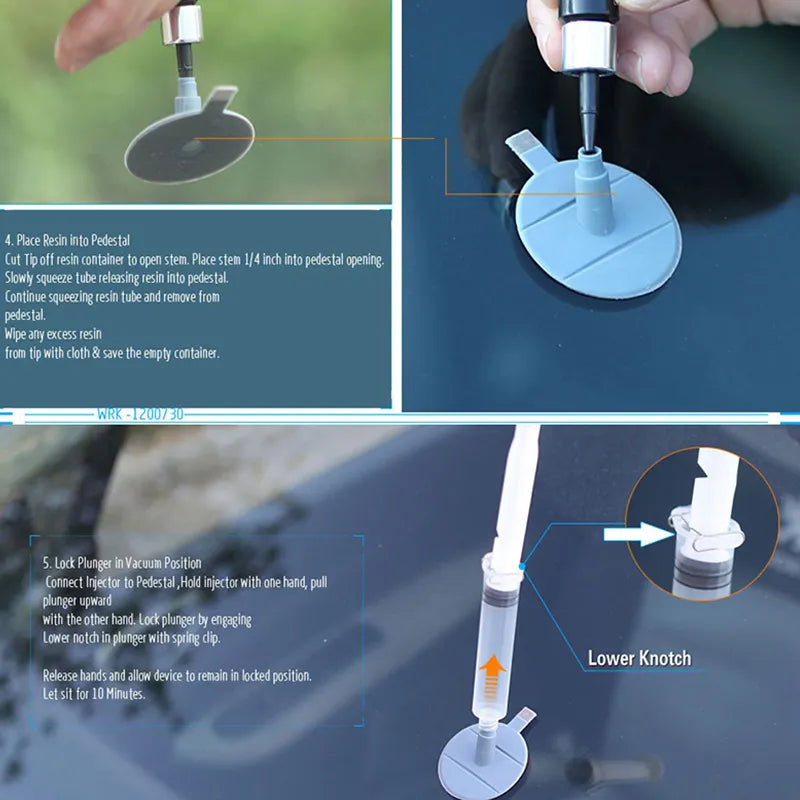
4 . Place Resin into Pedestal
Cut Tip off resin container to open stem . Place stem 1 / 4 inch into pedestal opening Slowly squeeze tube releasing resin into pedestal .
Continue squeezing resin tube and remove from pedestal Wipe any excess resin from tip with cloth save the empty container
5 . Lock Plunger in Vacuum Position
Connect Injector to Pedestal , Hold injector with one hand , pull plunger upward with the other hand , Lock plunger by engaging Lower notch in plunger with spring clip Release hands and allow device to remain in locked position Let sit for 10 Minutes
6 . Fill Injector with Air
Take injector out from the pedestal Make the plunger to its maxi position Put the injector back to the pedestal

7 . Move Plunger to Pressure
Hold Injector with one hand and ROTATE plunger releasing spring Clip from LOWER notch
DEPRESS plunger downward ENGAGE UPPER notch with spring clip
LET SIT FOR A MINIMUM OF 20 MINUTES
8 . Remove Pedestal from Glass
Loosen outer edges of pedestal with a safety razor
Once top part of pedestal and seal is bent away from glass surface , grip pedestal tab as shown Slowly pull up until removed Wipe and remove excess resin
9 . PIT Filling Procedure
Hold resin container in one hand and make read the clear curing film in the other hand as shown Slowly squeeze resin container applying a drop of resin in Place clear curing film over PLT holding resin in the PIT
10 . Curing FinishingRun safety razor lightly over clear filn to vent outany air bubbles . Note Ultra Videt sun rays curethe resin . Park vehicle in direct sunlight for15 Minutes
11 . On hazy days , park vehicle in sun light for minimum oft hourTo Finish , scrap off cured resin and clear film flush with the glass surface using safety razor


2. For USA/CA /RU the shipping is quickly.